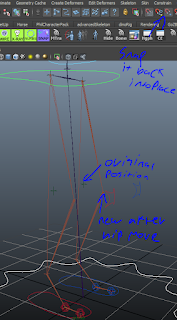
Unfortunately when I started making the rig I had only a single mesh to approximate the location of the joints and with most approximates it turned out to be pretty good for everything expect one area.
The hip joints were slightly out of position, I repositioned the hips and spine to accommodate the change I needed to make this moved the knee bone out of place so I placed locators so I could snap the bone back into it's original place after making the bone adjustments.
I set up the project so that the Control Rig and Mesh are both referenced into a single file where the character can be skinned this
This way the character artist can make last minute tweaks/ work on the UVs while I work on the skinning.
But of course on moving the bones I broke the skinning for all of my characters.
 After moving the hips this is what happened. Not so attractive, this mesh has pretty good skinning (Minus the now broken legs) on it already and I didn't want to lose the work have done skinning so far so I used a little trick.
Export skin weights.
In Maya, you have the ability to export out the skinning information on a vertex to a file with images.
- Export your skin weights.
- Detach the skin from the control rig bones, this will remove the deformation caused by the bones moving.
- Add a basic skin bind
- Re import the skin weights.
If you're getting issues at the end, try exporting a larger size weight map (Done by clicking the little square next to export skin weights) there is a bug in Maya where the import File extension is set to one that isn't the same as the extension we used on exporting the skinweights, on import switch to "all" and select the .Weightmap file
After a few seconds (Or minutes if you have a large number of bones) of watching maya match vertex to bone, everything should be back to normal.
You have successfully moved bones and reimported skin weights!
Also as a little bonus. The .weightmap file can be opened in a text editor and edited.

This can be very useful in circumstances where a mesh has changed and old weight map will throw an error as the vertcount/uvw's have changed, delete the line associated the old verts with and bam! It works, meaning you can also import skin for specific areas.
Lets say somewhere along the line I skinned all the fingers perfectly but I mistakenly removed the skinning for the feet, well export that old weightmap, edit the file to remove the fingers, reimport and suddenly I can undo a mistake I made without noticing...


